“Once you overcome the one-inch tall barrier of subtitles, you will be introduced to so many more amazing films.”
- Bong Joonho
While Director Bong is correct in a sense, subtitles are not simply a barrier, but more of a window through which viewers can experience amazing content, and a viewer’s experience is reliant on the quality of this window. If you wish to faithfully translate a product, the viewers must be able to easily comprehend the content and grasp the intent of the things being said or written.
This guide aims to document some of the basics of every step in the subtitling process, for both beginners just starting out, and experienced people who are curious about our work process or want to branch into other roles. The information here is neither definitive nor complete, but should give a nice starting point for anyone interested in creating subtitles. We will link to some other resources to look in to.
Chapter 0: Workflow
“Workflow is understanding your job, understanding your tools, and then not thinking about it any more.”
- Merlin Mann
Yeah, yeah, I know it’s boring, but a good workflow is essential for creating subtitles in an organised and timely manner.
When working alone, you can probably get away with just having an organised folder of subtitle files and raw videos. However, be sure to safely back up the final subtitle files at least. You don’t want to lose hours of hard work to a hard drive dying or an accidental delete while cleaning up.
This simplistic workflow doesn’t work as well in a team. You don’t want to be drowning in a mess of different versions sent between the different members or having to redo work you already did because someone else was also making changes to a file at the same time, conflicting with your alterations.
To start, assign roles. It should be clear who is doing what, this will be helpful in the crediting process as well. This can either be done by role (A = Translator, B = Typesetter) or by time division (A does first half, B does second). Splitting episodes within roles comes with the disadvantage of having potential inconsistencies in style or quality, making both communication and a strict Quality Check invaluable parts of a team project. The last thing you want to see as a viewer is someone’s name suddenly changing in spelling halfway through an episode.
For file organization, we personally use GitHub. It allows for easy viewing of updates, allowing us to check who contributes what and (usually) easily merges the progress of an episode. Git does have a bit of a learning curve though, so you may run into problems if you don’t have anyone who understands the software.
Something like a shared and locally synced Google Drive folder should also work, but carries the risk of losing work when multiple people make edits at the same time.
Both of these methods work fine if you are working consecutively, but if you want to finish in a timely manner you need to parallelise your workflow. The easiest way to do this, is to split the project in to multiple files and merge them in the end.
Git can also be used to merge changes together, but has problems with stuff like sorting lines differently.
Chapter 0.5: Obtaining Raws
“Work is taking the raw material of creation and developing it for the sake of others.”
- Timothy Keller
This can differ greatly according to the show or movie, and sometimes it may be deserving of it’s own credit depending on how niche the product is. Ultimately our advice is to try and find the best quality raw material available to work on, to ensure the best experience possible for the audience. It’s very easy to scale down work if necessary.
On a similar note, sometimes it’s possible to find subtitle files made by either professional studios or machine translation services. In some cases, these subtitles might be high quality enough to deter your work, but in my experience, almost all prior subtitles I find have serious flaws that would cause me to consider them “unacceptable”. In any case, these subtitles can provide something of a short cut, as they can provide placeholder lines which means that a timer’s role is going to be more centred on syncing the subtitles through a program like SubtitleEdit and fine tuning each line. These files can typically be helpful for timing and translations (as something of a second opinion), but not much more than that.
Chapter 1: Timing
“It’s the timing.”
- Hong Jinho
When creating typesetted and/or precisely timed subtitles Aegisub is the way to go. Some people are using Subtitle Edit, but creating frame perfect subtitles is much harder that way.
Once you open Aegisub it should look something like this:
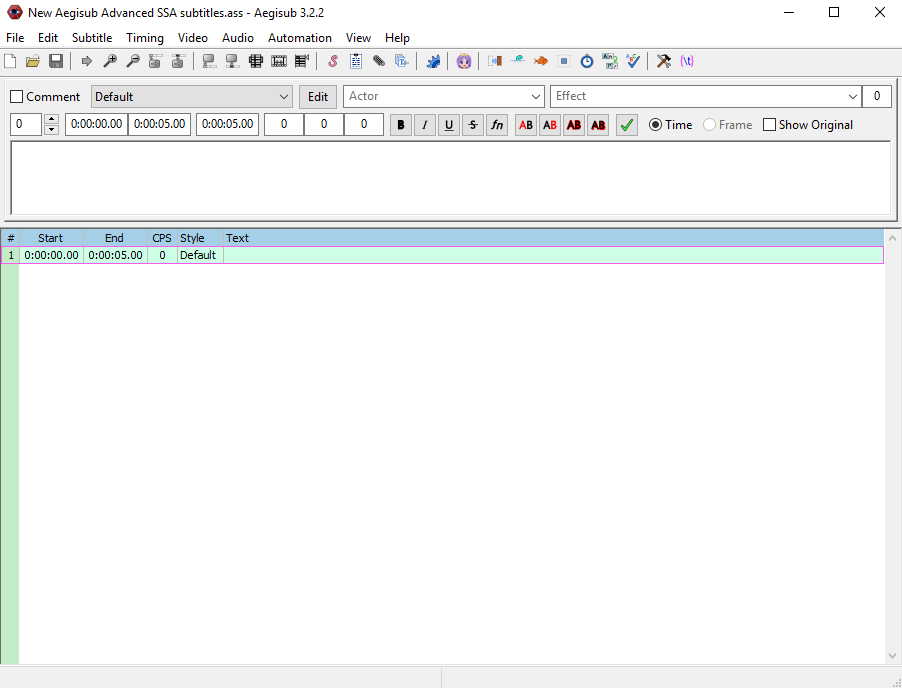
Go to “Video > Open Video” and locate the video file on your computer, it’ll open on the very first frame so don’t be alarmed if your screen looks a bit weird.
Shortcuts that will make your life ridiculously easier, so it’s good to familiarize yourself with them from the start.
These are the most commonly used shortcuts:
Ctrl + P: Plays and pauses the video.Ctrl + 1: Goes to the start of the selected line.Ctrl + 2: Goes to the end of the selected line.Ctrl + 3: This makes the start of the line precisely where you have the video at the moment (so if you’re at the start of the video it makes the line start from the very beginning of the video).Ctrl + 4: Changes the end of the line, the opposite of the above.Ctrl + Shift + D: Divides the line at the current frame, this can be used as a shortcut to make new lines if you press it after the line ends, which gives a line that lasts for 1 frame, meaning you’ll just need to make a new endpoint. NOTE: This line will be identical in content to the line you “divided” to get it, so it will probably need to be changed.
In the settings you can also change the shortcut mappings (i.e. Play/Pause -> Space instead of Ctrl + P)
Ultimately, your process should be whatever you’re comfortable with. You can develop this process with experience, but to perhaps give you some guidance, I’ll provide what I would consider my experience if I were timing from scratch. This is how my process usually goes…
- Let the video play (from the start of the segment I’m timing).
- Pause when I see or hear a line (if you aren’t versed in Korean this could be a bit tricky, but try and focus on dialogue while considering the captions).
- Use the arrow keys to move frames back to a good time to start the line. Usually a tiny bit before someone starts speaking (for dialogue) or the precise moment that a caption comes on screen. The automatic audio display that Aegisub provides could be helpful for this, since you can get an idea of when people start talking without relying on the video.
- Right click, select
Insert at video time (after). - Play the video, wait for a good time to end the line. Usually when enough time has passed since someone stopped speaking (or 2 people have finished saying something), the caption disappears from the screen, someone else starts speaking, there’s a camera cut (shortly after they stop speaking), or their line is too long and needs to be split up.
- Press
Ctrl + 4when I reach that spot. - Fill in the line as
(TL). This will give you text to use so you can check in STEP 9. This also helps the translating process as you can pressCtrl + Fand search for the phrase(TL)to find any untranslated lines that need attention. - Continue the video and press
Ctrl + Shift + Dwhen you find a new time to start a line. - Make sure the lines are either distinct or connected, basically you don’t want the subtitles to blink in and out for half a second between different lines, unless there’s an actual meaningful gap.
Ctrl + 1andCtrl + 2would be helpful at this stage to check the timing.
Note: Depending on the style you’re going for, you may want no overlapping lines, for “professional” subs you might see in movies, or stylised subtitles like Bumdidlyumptious’ godly work (or the old Running Man eps by iSubs).
In the second case, you need to sub captions and dialogue separately, so keep your focus to avoid errors, since you may be working on 2 lines at any one time.
It’d also help to place-hold captions as (C) so it’s clear what aspect of the clip should be translated for that line.
Chapter 2: Translating
“Every language is a world. Without translation, we would inhabit parishes bordering on silence.”
- George Steiner
So this part is fairly self-explanatory, you go through each line and translate what’s being said/written into English. That’s why this section will mainly consist of tips or things to keep in mind (Note: Will add more if people ask things that require clarification).
- Be consistent with names and terms. For Korean terms, I tend to include people saying “hyung”, “oppa”, or “maknae”, but more complex terms unnecessarily increases the bar of knowledge needed to enjoy. ie. Someone calls Shindong “Dong-ah”, this won’t make sense to some people, so keep that as “Shindong”, to help the show be accessible to as many people as possible while still maintaining some of the nuances.
- Don’t be afraid to paraphrase or add flourishes, in my opinion the top priority should be crafting lines that viewers can easily understand and interpret, which includes connotations and emotions. So if someone is speaking in a very angry way, it’s okay to change their words (using synonyms, sentence restructuring, etc) to reflect this.
- Continuing on, the second priority should be preserving the aesthetic that is being created by the show. So if the show is attempting to be epic, use epic-sounding language, if it’s trying to be goofy, be a little more loose and comedic.
- Keep an eye on the CPS box in Aegisub, if it starts getting red, I would advise looking over your line and rephrasing it so it’s more concise.
- If two people are talking in the same line, it’s important to distinguish them, the way I do this is: - [Line A] / - [Line B]. (It looks better in subtitle form).
- For bridging cultural differences, it’s important to choose translations that focus more on the message/aesthetic than the precise meaning. Like 유느님 could be directly translated as Mr. Yoo, God Yoo is a translation that helps convey the idea better.
- Don’t feel obligated to preserve loan words or English words said by someone, if it doesn’t work in a concise/cohesive line, don’t force it.
- Try and avoid repetition, I’ve occasionally found sequences of lines that use the same word over and over again, or express the same sentiment. You might have to use some creativity here or cut some words. Like alternating between “Sure”, “Yeah”, and “You’re right” even if they’re all saying the same thing. Or between “The card’s weight”, “the weight”, or “the weight of the card”.
- You might occasionally see some subtitles that translate exclamations like “oh” or laughing, but I find that people are usually able to understand universal things like that, meaning that it’s unnecessary to translate to that level of detail.
- In the event of cultural references or terms, it’s important to convert that information so it’s easy for the viewer to understand, this can be in the form of an additional note or a reconstruction of the line.
- For example, if someone references a famous athlete that foreigners would likely not be familiar with, add a note in the subtitle that briefly explains who that person is and allow the viewer to understand why it’s relevant.
- This is also relevant with sayings, like in Korea they say “The other person’s rice cake looks bigger” as an analogue to the “grass is always greener” saying. In cases like this, I find it better to find an appropriate English equivalent to sayings such as this, unless it’s further elaborated on/joked about, in which case a note would suffice in order to preserve the flow of the conversation.
Chapter 3: Typesetting
“I fully recommend finding something better to waste your time.”
- CoffeeFlux
Typesetting is about stylising the subtitles. By using a more advanced subtitle formats like ASS instead of STR the subtitle creator can choose font, size, position, colour, shadow, outline and more of the displayed subs. This allows for a visually pleasing way to translate signs and other captions.
Here some examples on how typesetting can enhance the viewing experience.

Doesn’t this look much nicer than (Flustered) at the bottom? - Typesetting by Bumdidlyumptious

It would be quite difficult to bring across all this information without typesetting
The anime fansubbing scene has truly done some amazing things in regards to typesetting.
As a typesetter your job is it to make the subtitles fit in as best as possible and get all the necessary information across to the viewer.
Before getting started make sure the YCbCr Matrix in your Script Properties is set to TV.709.
In 99% of cases that will be the correct option.
If you use the wrong option Aegisub will display the video differently resulting in you choosing the wrong colours.
In Korean Variety shows, caption styles often repeat across a show. Your typical workflow would start by creating different styles.
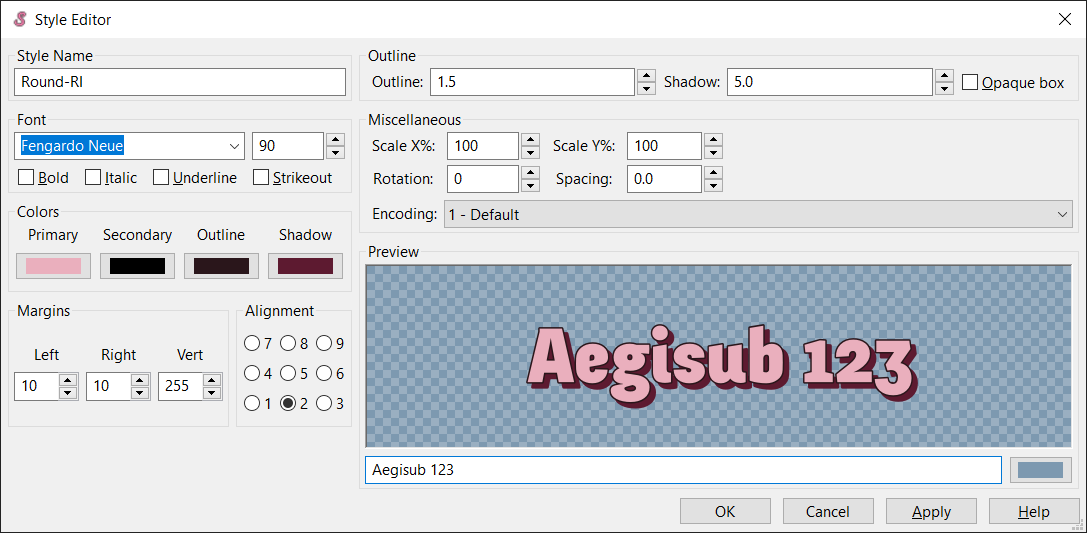
Style from Girls’ High Mystery Class
It is well worth your time to find a good font and getting the subtitle style just right. This will save you work later when you just need to select the style.
There will be times when you need to manually override some parameters of the style. This is done with override tags that can be looked up in the Aegisub Manual.
The most common override tags also have easy to use GUI functions. Position, Rotation, Scaling, Clip are to the left of the video. Color, Bold, Italics are on top of the line text editor.
We usually have one style for each colour variant. This allows most lines to just require \pos and \r override tags.
With \rStyleName you can change mid line to a different style.
For more advanced typesetting like masking and animations you should start looking in to scripts for automation and hotkeys. A good place to start is unanimated typesetting guide.
Chapter 4: Encoding/Remuxing
“Don’t Panic.”
- Douglas Adams
There is a lot to say and learn about this. I myself am just getting started.
With software like vapoursynth (and a lot of patience) it is possible to get exceptional video quality out of subpar sources. But I won’t be touching on vapoursynth or filter chains. There are people way more qualified than me to talk about that stuff.
This will just be a very basic introduction on how to not screw stuff up.
There are two ways you can go: softsubs and hardsubs
Softsub mean the video container (mkv, mp4) not only contains an audio and video track but also a subtitle track. This allows adding multiple languages to a single file or gives the viewer the option to disable the subtitles. It also doesn’t require you to re-encode the video saving processing time and preserving quality.
Softsubs are generally highly recommended. A potential caveat is that they (especially typesetted) don’t work well with streaming sites.
Since MP4 only supports basic timed text MKV is the go to format for typesetted softsubs.
To remux the file use MKVToolNix and add your video and subtitle file. Set language tags and under attachments add all used fonts (can be collected with Aegisub Font Collector). Adding the fonts to the files is recommended to ensure the viewer has all required fonts for playback.
If you really need to create hardsubs here is the quick and dirty way:
Download ffmpeg and place ffmpeg.exe in the same folder as your video and subtitle file.
Open the Terminal/Command line and execute
ffmpeg.exe -i VIDEO_FILE.mp4 -vf "ass=SUBTITLE_FILE.ass" OUTPUT_FILE.mp4
You can tweak quality/filesize by adding the -crf and -preset parameters.
Take a look at this page to learn more.
Note: As of writing this ffmpeg incorrectly deals with subtitle colourspaces resulting in subtitle colours being slightly off. As an alternative you can use mpv.
Chapter 5: QC/Beta
“Perfection is not attainable, but if we chase perfection we can catch excellence.”
- Vince Lombardi
At this point you have probably spent hours in Aegisub and feel like you just want to release the thing and be done with it. But having one last watch through (from the perspective of a viewer) and fixing anything you might have missed is an important step in ensuring that final layer of polish that separates passable subtitles from fantastic ones. You’ve already spent so much time producing the damn thing, why not go the extra step to make it near perfect? Nothing is more annoying than noticing glaring mistakes after release, tainting your work or requiring a V2.
Truth be told, there will always be areas to improve. Even now, I (SharpShark, for this paragraph) still find places I wish I could’ve improved in Society Game 2, despite already performing probably three separate beta passes on the season. But it’s important to try and reduce as many of these errors as possible, just be reassured that all your effort will be reflected in the quality of the viewers’ experience, even if they don’t realise it.
Chapter 6: Trying it Yourself
“By three methods we may learn wisdom: First, by reflection, which is noblest; Second, by imitation, which is easiest; and third by experience, which is the bitterest.”
- Confucius
Note: This section is somewhat outdated and since then our styling and typesetting in general has improved. Since it is still a valuable exercise to go through we will keep this section here. Hopefully we will update this section in the near future.
I’ve made a Google Drive with a ~1 minute clip from The Great Escape that I’ve subtitled in my free time. I’ve included subs at various stages in the process for if you want to try out a specific step of the process, as well as my final version for if you’d like to check what I decided to do. Files are named according to the stage that the files have reached in subtitling.
All files include my progress in terms of fonts, but if you’d like to start from scratch there, feel free to delete the styles by viewing the Style Manager. I also uploaded the unique fonts I used for my typesetting, which you would need to download before viewing my styling as I intended for it to be seen.
We also provide subtitle files for all of our finished projects. Feel free to download them and take a look.
If you have questions or suggestions, feel free to shoot us a message.